Test Options
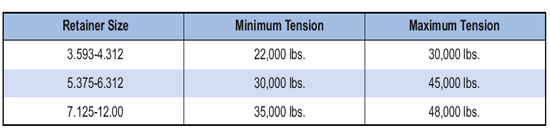
- The tubing or drill pipe can be pressure tested by simply pulling up five thousand pounds at the tool and applying pump pressure to the tubing
- The retainer can now be tested for seal-off by applying pressure down the annulus or by slacking off five thousand pounds weight on retainer and applying pump pressure down the tubing and pumping into formation
- These tests are performed before the setting tool is released from the retainer
- If seal-off has not been accomplished, up-strain on the tubing can again be applied and the tools can be retested until seal-off is accomplished
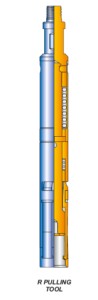
Releasing Retainer
- Hold an up-strain of approximately one thousand pounds on the tubing
- Apply torque to the right until torque screws are sheared. Each screw requires 200 – 400 foot-pounds
- Continue right-hand rotation for ten turns or until latch is felt releasing
- After releasing from retainer, the setting tool can be relatched into the retainer with three to five thousand pounds set-down weight. This stabilizes at two thousand five hundred pounds with repetition
- The valve will open when the stinger is fully engaged into the retainer and will close with a 2 inch upstroke at the tool. The stinger will remain sealed in the bore as long as snap-out force is not exceeded
Assembly Instructions
(Note: grease all threaded connections and o-ring surfaces)
- Slide the Upper Mandrel (item 2) through the Drag Housing (item 4), entering at the end of drag housing with external threads
- Screw the Top Coupling (item 1) onto the Upper Mandrel (item 2). Place the Top Coupling in the vise and tighten with wrench placed in the groove on the Upper Mandrel
- Slide on the Stop Ring (item 11). Screw on the Lock Nut (item 14). Install the Set Screw (item 13)
- Screw the Drag Housing (item 4) toward the Stop Ring (item 11). Turn the Stop Ring with the Drag Housing until maximum butting surface is obtained. Make certain it will not jam by backing off the Drag Housing one round. If holes in the Stop Ring and the Upper Mandrel are not aligned at this point, turn the Stop Ring to the right until alignment is obtained. Install the Set Screws (item 12). for 7” and Larger Sizes only
- Slide the Upper Drag Bushing (item 3) over the Drag Housing (item 4) to the far end and insert the Set Screws (item 31). Repeat with the Lower Drag Bushing (item 6)
- Screw the Adjuster Sleeve (item 8) onto the Drag Housing (item 4) as far as it can go. Start the Set Screw (item 9)and tighten