Guidelines for Running HM Bridge Plugs
Recommended Procedure Before Running HM Bridge Plug:
- Run a casing scraper (if necessary) to clean inner wall of casing and free any debris or obstructions
- Circulate well to clean well of debris and junk
- Check casing I.D. 2 ft.-3 ft. below setting depth to insure no restrictions exist
Make-up Procedure:
- Make up tubing on tubing adapter by placing back-up on tubing adapter and rotate tubing to the right until tight
- Do not remove tubing adapter from plug to make-up
Running In:
- Run into well at uniform rate – no faster than 30 seconds per 90 foot stand. Be certain tubing is free of debris and excessive scale
- Avoid unnecessary right-hand rotation of tubing string
- Use slow starts and stops when moving tubing string – no jerking
Setting HM Plug:
- Run tubing to desired setting point. Never set in collars or where milling has occurred. Set in static conditions (no fluid or gas movement)
- Drop ball down tubing string – the ball should be 1 1/4 diameter. Allow approximately 5 minutes per 1010 feet for ball to travel in water. More time is needed in mud or viscous fluids
- Apply pump pressure to tubing string until 2000 psi is reached. This pressure will stroke cylinder down into slip. The slip will break into segments and make contact with casing NOTE: If you lose pressure before reaching 2000 psi, go on to the next step. In heavier weights of casing, slip and hydro sleeve travel is limited which prevents pressure loss. Simply stop at 2000 psi and proceed to the next step
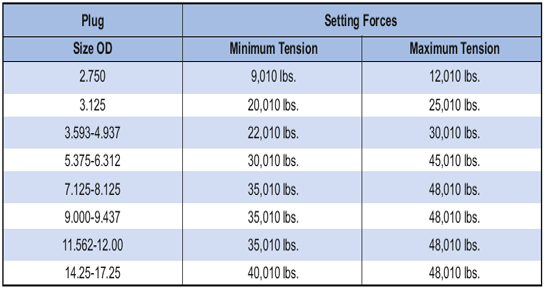
- Bleed pressure and pull recommended tension above the pipe weight at the tool, to complete setting the plug. Hold tension for 3 to 5 minutes. It is recommended to calculate tubing stretch versus using weight indicator for true pull. See formula below
- The tubing string may be released from the H-M Plug by pulling 500 lbs. tension at the tool and rotating the workstring 9 turns to the right at the tool


